本周总结
主要工作总结
- 学习 Isaac Gym 官方文档
- 将 Go1 导入 Legged Gym 进行测试
- 初步了解了 CPGs (Central Pattern Generator)
心得体会
本周四五六由于睡眠质量不佳,同时工作时间比较长,导致状态不佳,效率也较低。周日下午在看 Isaac Gym 时给自己一个小目标——保持专注在 30 分钟内看完 Tensor API 部分,然最后并没有看完,但是能感觉到人的注意力集中了一些,同时整个人的精气神也好一些
所以我想当状态不好时,可以找一些容易完成的任务,给自己一个极短期目标,并且不要太过在意是否完成(能完成更好)。只要结果是自己能比之前更专心的做事情,那便能给自己一些积极的暗示和正向的能量,从而摆脱状态低谷
课余学习
开始阅读《网络是怎样连接的》 by 户根勤 (日)。本书共6章,第1.1章完
2023.07.17
Learning agile and dynamic motor skills for legged robots by Hwangbo, Lee, Hutter
方法简述:
实验形式:
文章亮点:
实物机器人类型:ANYmal
仿真训练平台:
实验数据 / 源代码:
视频:Learning Agile and Dynamic Motor Skills for Legged Robots - YouTube
用户坐标系下的 (单位) 重力方向向量
欧拉角

俯仰、偏航、滚动分别就是绕z轴、y轴、x轴旋转
将欧拉角表示为 ($\varphi$, $\theta$, $\psi$)【说明:($\varphi$:滚动角 roll,$\theta$:偏航角 yaw,$\psi$:俯仰角 pitch】,那么3D空间一般旋转矩阵M就可以表示为三个旋转矩阵的积:
用户坐标系姿态获取
getBasePositionAndOrientation reports the current position and orientation of the base (or root link) of the body in Cartesian world coordinates. The orientation is a quaternion in [x,y,z,w] format.
getEulerFromQuaternion requires quaternion format [x,y,z,w] and returns a list of 3 floating point values, a vec3. The rotation order is first roll around X, then pitch around Y and finally yaw around Z, as in the ROS URDF rpy convention.
URDF (United Robotics Description Format)
- 无处不在的小土 - URDF 和机器人模型 (一))
- 无处不在的小土 - URDF 和机器人模型 (二))
- URDF学习 1 - 什么是 URDF 以及怎么理解一个 URDF 文件 | Wo看见常威在打来福的博客
- 初次了解 URDF | 小白乔学技术的博客
- 通用机器人描述格式URDF文件简介与生成 - 知乎
- cn/urdf/Tutorials - ROS Wiki
1 | check_urdf <urdf_name>.urdf |
2023.07.18
早上结石引发腰腹疼痛,下午去医院就诊。
PyBullet Torque Control
Applying torque control in PyByllet makes object fly away from the secene - Stack Overflow
Python Examples of p.TORQUE_CONTROL
官方文档 PyBullet Quickstart Guide - setJointMotorControl2/Array 中写道
We can control a robot by setting a desired control mode for one or more joint motors. During the stepSimulation the physics engine will simulate the motors to reach the given target value that can be reached within the maximum motor forces and other constraints.
Important Note: by default, each revolute joint and prismatic joint is motorized using a velocity motor. You can disable those default motor by using a maximum force of 0. This will let you perform torque control.
1 | maxForce = 0 |
Actuator Network
Actuator Network Training · Issue #2 · Improbable-AI/walk-these-ways · GitHub
2023.07.19
Python 新知
pybullet.setAdditionalSearchPath()
pybullet_data.getDataPath()
os.path.join()
os.path.dirname()
开会
Quadruped — isaacsim 2022.2.1 documentation
Omniverse Launcher 安装
失败及原因
AppImages 是一个文件系统,需要 FUSE 版本为 2 才能运行,但是 Ubuntu 22.04 的发行版本没有对其进行原始的配置的安装,重新安装并且配置即可
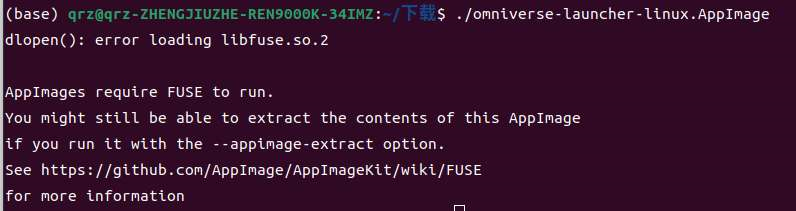
解决方法
Ubuntu 22.04 解决使用 .AppImage 文件方法_ubuntu 打开 appimage | splendid.rain生的博客
Ubuntu 升级到22.04之后,之前的 AppImage 点击不能运行了
其中不建议在 Ubuntu 版本 $\ge$ 22.04 时安装 fuse
1 | sudo apt install fuse libfuse2 |
或者
1 | sudo add-apt-repository universe |
安装 Isaac Sim
Isaac Sim探索 |(一)安装 Omniverse 及 Isaac Sim - 知乎
2023.07.20
模型 / 仿真环境验证
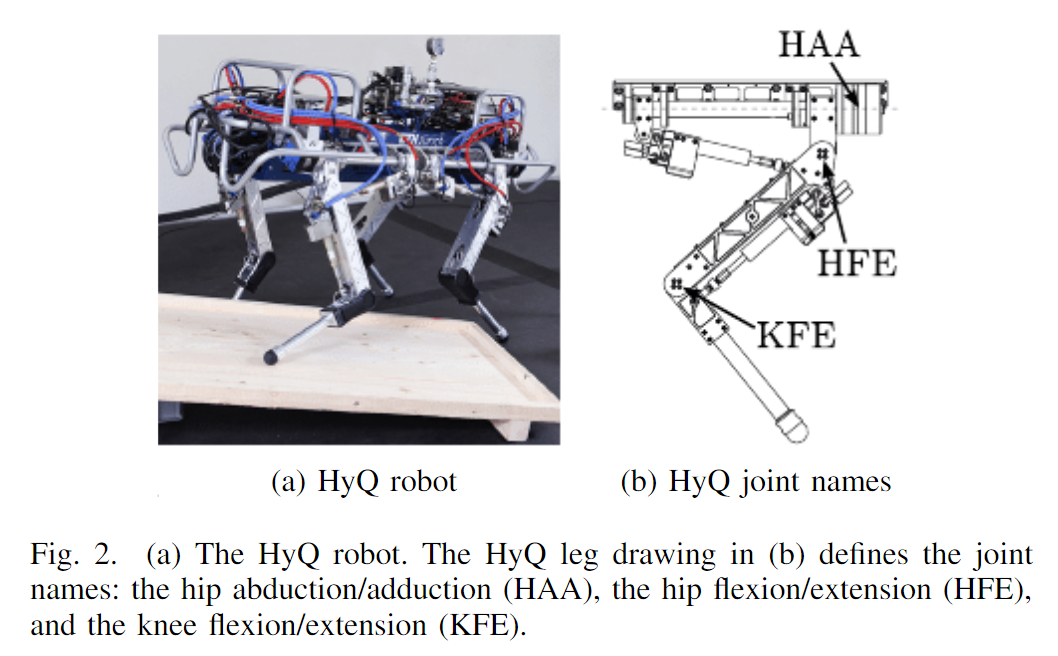
Quadruped Joint Names
Each of HyQ’s legs has three active rotational degrees of freedom (DOF): the hip abduction/adduction (HAA) joint, the hip flexion/extension (HFE) joint, and the knee flexion/extension joint (KFE), as depicted in Fig. 2(b). More details on the robot design, kinematics and dimensions can be found in [8]. All the joints are actuated by high-speed servovalves connected to hydraulic asymmetric cylinders (HFE and KFE) and semi-rotary vane actuators (HAA).
文件修改
修改 URDF
| JOINT / LINK NAME | Anymal | A1 | Go1 |
|---|---|---|---|
| 左前 / 左后 / 右前 / 右后 | LF / LH / RF / RH | FL / FR / RF / RR | FL / FR / RF / RR |
| 髋关节 | HAA | hip_joint | hip_joint |
| 大腿关节 | HFE | thigh_joint | thigh_joint |
| 小腿关节 | KFE | calf_joint | calf_joint |
修改 task 配置文件 <task>.yaml
修改强化学习配置文件 <task>PPO.yaml
如何指定对应 action space 的12 个关节
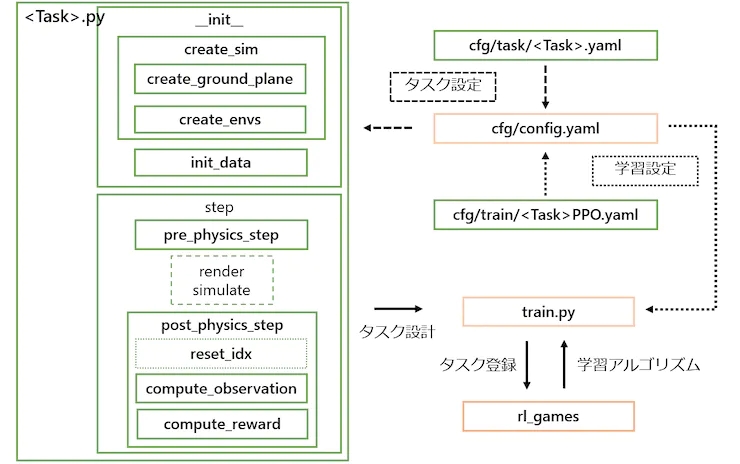
如何构建一个 IsaacGymEnvs 任务
资料查阅
阅读 framework.md 的 Creating a New Task
使用 Isaac Gym 来强化学习mycobot 抓取任务 | 电子发烧友网
Isaac-gym(9):项目更新、benchmarks框架梳理 | hongliyu_lvliyu的博客

构建方法
构建一个 Task 需要完善以下三个部分:
- 主程序:
<TaskName>.py(主体程序,包含程序主要设计,环境生成,奖励函数,控制模块等等) - 强化学习算法配置文件:
<TaskName>.yaml(位于~/isaacgymenvs/cfg/train) - task 参数文件:
<TaskName>PPO.yaml(位于~/isaacgymenvs/cfg/task)
训练后,生成的模型文件位于~/isaacgymenvs/runs/<TaskName>
文件夹内包含nn,summaries.config.yaml三个文件,其中config.yaml为本次训练的环境参数(env)、仿真参数(sim)、训练参数(train)等
Creating a New Task
使用 Isaac Gym 的 RL framework 构建一个 Task 首要是先在 isaacgymenvs/tasks 中创建一个新的脚本文件:首先 import 必要的库
1 | from isaacgym import gymtorch |
接着创建一个继承 VecTask 的类 MyNewTask
1 | class MyNewTask(VecTask): |
为了在 train.py 运行任务,需要在 isaacgymenvs/tasks 的 __init__.py 中添加如下代码:
1 | from isaacgymenvs.tasks.my_new_task import MyNewTask |
最后创建相关的环境参数配置文件和强化学习配置文件即可
Isaac Gym
Isaac-gym(2): 官方文档之 examples_hongliyu_lvliyu的博客-CSDN博客
Isaac-gym(3): 官方文档——programming 之仿真设置_gym官方文档 | hongliyu_lvliyu的博客
Isaac-gym(4): 物理模拟 isaac gym 可以隐藏关节吗 | hongliyu_lvliyu的博客
Isaac Gym Environments for Legged Robots - ETH Zurich $*$
Code Structure $*$
- Each environment is defined by an env file (
legged_robot.py) and a config file (legged_robot_config.py). The config file contains two classes: one conatianing all the environment parameters (LeggedRobotCfg) and one for the training parameters (LeggedRobotCfgPPo). - Both env and config classes use inheritance.
- Each non-zero reward scale specified in
cfgwill add a function with a corresponding name to the list of elements which will be summed to get the total reward. - Tasks must be registered using
task_registry.register(name, EnvClass, EnvConfig, TrainConfig). This is done inenvs/__init__.py, but can also be done from outside of this repository.
Usage
Train:
1
python issacgym_anymal/scripts/train.py --task=anymal_c_flat
- To run on CPU add following arguments:
--sim_device=cpu,--rl_device=cpu(sim on CPU and rl on GPU is possible). - To run headless (no rendering) add
--headless. - Important: To improve performance, once the training starts press
vto stop the rendering. You can then enable it later to check the progress. - The trained policy is saved in
issacgym_anymal/logs/<experiment_name>/<date_time>_<run_name>/model_<iteration>.pt. Where<experiment_name>and<run_name>are defined in the train config. - The following command line arguments override the values set in the config files:
- —task TASK: Task name.
- —resume: Resume training from a checkpoint
- —experiment_name EXPERIMENT_NAME: Name of the experiment to run or load.
- —run_name RUN_NAME: Name of the run.
- —load_run LOAD_RUN: Name of the run to load when resume=True. If -1: will load the last run.
- —checkpoint CHECKPOINT: Saved model checkpoint number. If -1: will load the last checkpoint.
- —num_envs NUM_ENVS: Number of environments to create.
- To run on CPU add following arguments:
Play a trained policy:
1
python issacgym_anymal/scripts/play.py --task=anymal_c_flat
- By default the loaded policy is the last model of the last run of the experiment folder.
- Other runs/model iteration can be selected by setting
load_runandcheckpointin the train config.
Adding a new environment $*$
The base environment legged_robot implements a rough terrain locomotion task. The corresponding cfg does not specify a robot asset (URDF/ MJCF) and no reward scales.
- Add a new folder to
envs/with'<your_env>_config.py, which inherit from an existing environment cfgs - If adding a new robot:
- Add the corresponding assets to
resourses/. - In
cfgset the asset path, define body names, default_joint_positions and PD gains. Specify the desiredtrain_cfgand the name of the environment (python class). - In
train_cfgsetexperiment_nameandrun_name
- Add the corresponding assets to
- (If needed) implement your environment in
.py, inherit from an existing environment, overwrite the desired functions and/or add your reward functions. - Register your env in
isaacgym_anymal/envs/__init__.py. - Modify/Tune other parameters in your
cfg,cfg_trainas needed. To remove a reward set its scale to zero. Do not modify parameters of other envs!
2023.07.21
Isaac Gym Environments for Legged Robots $*$ train.py
step(self, action) 结构
self.actions[clip]self.render()for _ in range(decimation)
self.torques=self._compute_torques(self.actions)self.gym.set_dof_actuation_force_tensor(...,...(self.torques))self.gym.simulate()self.gym.refresh_dof_state_tensor()
self.post_physics_step()检查 termination,计算 observations 和 rewardsself.gym.refresh_actor_root_state_tensor()self.gym.refresh_net_contact_force_tensor()计数器自增:
episode_length_buf,common_step_counter获取一些变量:
base_quat,base_lin_vel,base_ang_vel,projected_gravityself._post_physics_step_callback()在计算 terminations, observations 和 rewards 之前调用,根据目标和航向计算角速度命令,计算测量的地形高度并给机器人随机推力_resample_commands()一些环境选择随机指令 [env_ids]self.measured_heights=self._get_heights()self._push_robots()(common_step_counter % push_interval == 0)
self.check_termination()检查环境是否需要 resetself.reset_bufself.time_out_buf[episode_length_buf]
self.compute_reward()计算奖励 [self.reward_functions]self.reset_idx()重置部分环境 [env_ids]- 更新难度:
self._update_terrain_curriculum()self._update_command_curriculum()
- 重置机器人:
self._reset_dofs()self._reset_root_states()
- 随机指令:
_resample_commands() - 重置 buffers:
last_actions,last_dof_vel,feet_air_time,episode_length_buf,reset_buf
- 更新难度:
self.compute_observations()计算观测空间更新一些变量:
last_actions,last_dof_vel,last_root_vel
self.obs_buf[clip]- return
self.obs_buf,self.rew_buf,self.reset_buf,self.extras
create_sim(self) 结构
设置self.up_axis_idx
仿真环境 self.sim = self.gym.create_sim()
创建地形
Terrainself._create_ground_plane()self._create_heightfield()self._create_trimesh()
创建环境:self._create_envs()
- loads the robot URDF/MJCF asset
- For each environment
- creates the environment
- calls DOF and Rigid shape properties callbacks
- create actor with these properties and add them to the env
- Store indices of different bodies of the robot
asset_path,asset_root,asset_fileasset_options=gymapi.AssetOptions()…self.gym.load_asset()
Isaac Gym
阅读官方文档 (Isaac Gym 的 docs 文件夹中) 以及 RL Isaac Gym | hongliyu_lvliyu 的博客
- Isaac-gym(2): examples | hongliyu_lvliyu 的博客
- Isaac-gym(3): programming 之仿真设置 | hongliyu_lvliyu 的博客
- Isaac-gym(6): 环境创建、模型载入、actor 设置等 | hongliyu_lvliyu 的博客
- Isaac-gym(4): 物理模拟 | hongliyu_lvliyu 的博客
- Isaac-gym(7): 物理模拟(actor生成、创建、控制等)| hongliyu_lvliyu 的博客
- Isaac-gym(8):Tensor API | hongliyu_lvliyu 的博客
Simulation Setup
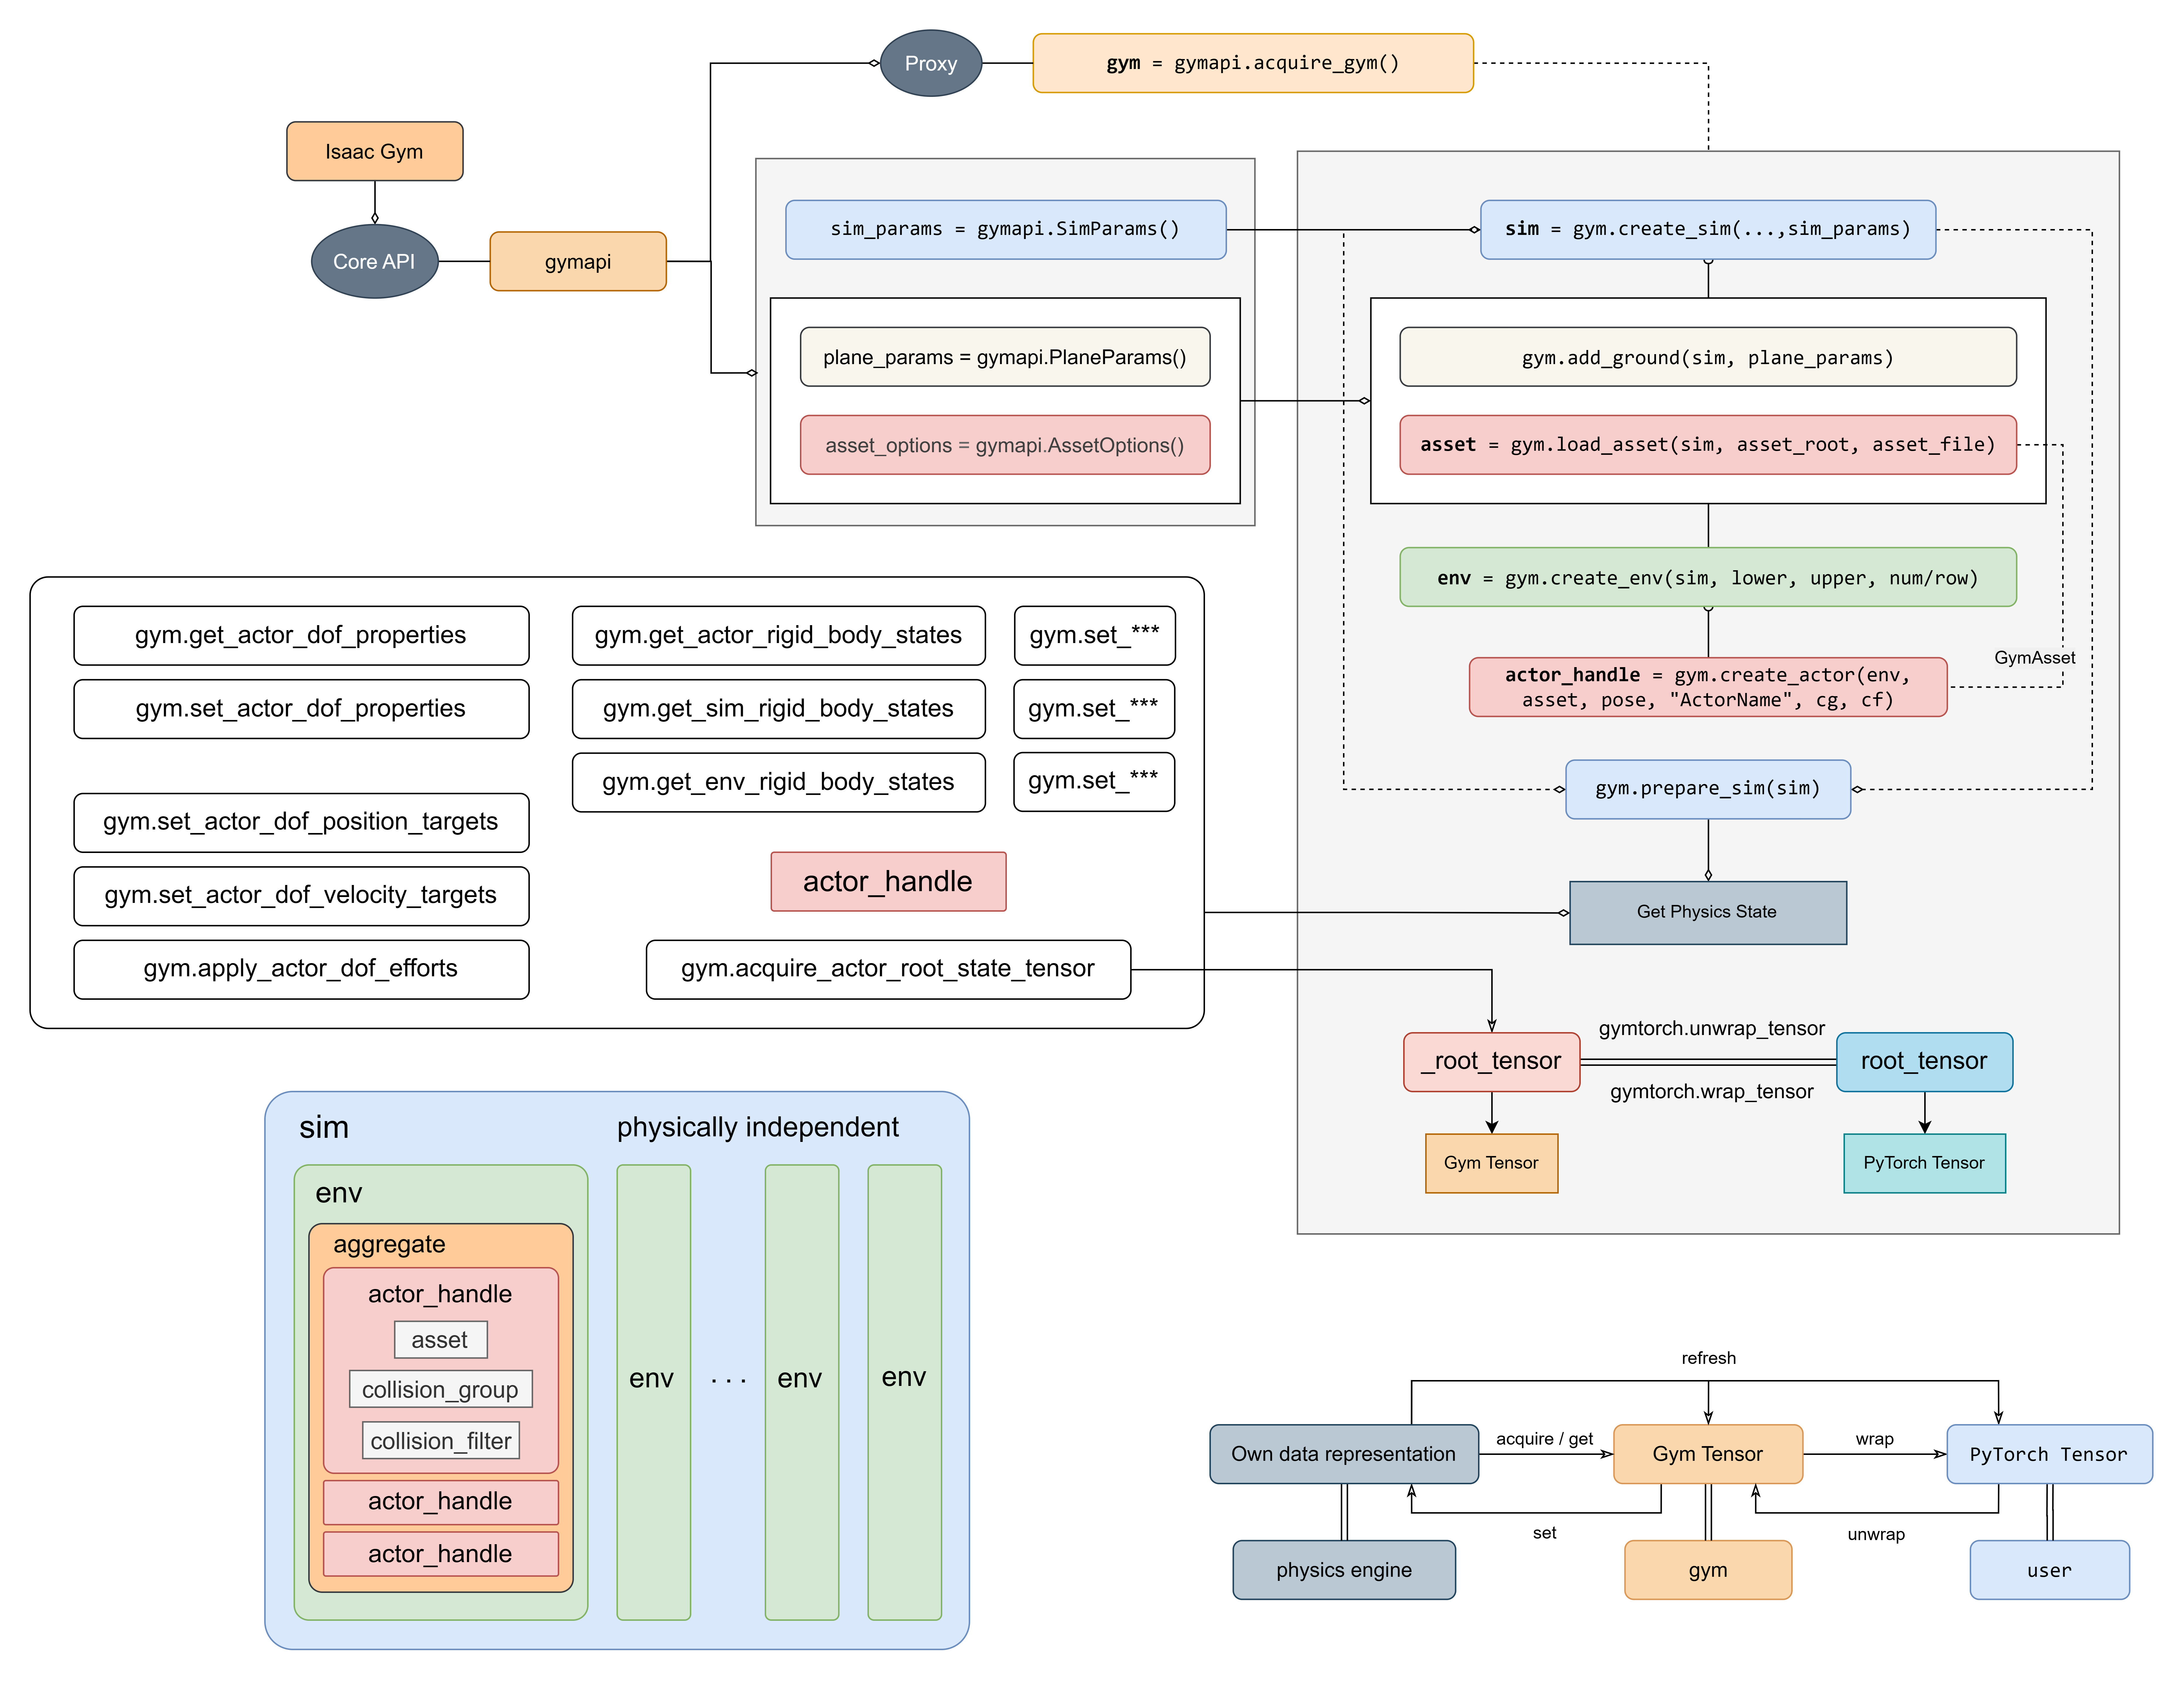
The core API, including supporting data types and constants, is defined in the gymapi module.
The gym object by itself doesn’t do very much. It only serves as a proxy for the Gym API.
The sim object contains physics and graphics contexts that will allow you to load assets, create environments, and interact with the simulation.
Physics Simulation
An actor is an instance of a GymAsset. The function create_actor adds an actor to an environment and returns an actor handle that can be used to interact with that actor later. For performance reasons, it is a good practice to save the handles during actor creation rather than looking them up every time while the simulation is running.
Each actor has an array of rigid bodies, joints, and DOFs.
Fixed, revolute, and prismatic joints are well-tested and fully supported.
Each degree of freedom can be independently actuated.
Controlling actors is done using the degrees-of-freedom. For each DOF, you can set the drive mode, limits, stiffness, damping, and targets. You can set these values per actor and override the default settings loaded from the asset.
DOF property arrays can be accessed for assets (get_asset_dof_properties) and individual actors (get_actor_dof_properties/set_actor_dof_properties). The getters return structured Numpy arrays with the following fields: hasLimits, lower, upper, driveMode, stiffness, damping, velocity,
effort, friction 和 armature
Note that DOF states do not include the pose or velocity of the root rigid body, so they don’t fully capture the actor state.
Tensor API
The Gym tensor API uses GPU-compatible data representations for interacting with simulations. It allows accessing the physics state directly on the GPU without copying data back and forth from the host. It also supports applying controls using tensors, which makes it possible to set up experiments that run fully on the GPU.
Tensors are well-established data structures for storing GPU-compatible data. Popular frameworks like PyTorch and TensorFlow support tensors as a core feature. The Gym tensor API is independent of other frameworks, but it is designed to be easily compatible with them. The Gym tensor API uses simple tensor descriptors, which specify the device, memory address, data type, and shape of a tensor. There is no special API for manipulating the data in the Gym tensors. Instead, the tensor descriptors can be converted to more usable tensor types, like PyTorch tensors, using interop utilities. Once a Gym tensor is “wrapped” in a PyTorch tensor, you can use all of the existing PyTorch utilities to work with the contents of the tensor.
To use GPU tensors, you must set the use_gpu_pipeline flag to True in the SimParams used to create the simulation. Also, you should configure PhysX to use the GPU.
Finally, after all the environments are fully set up, you must call prepare_sim to initialize the internal data structures used by the tensor API.
PyTorch ?
PyTorch 介绍以及基本使用、深入了解、案例分析 | _ㄣ知冷煖★的博客
2023.07.22
Isaac Gym - Tensor API
Simulation Setup
1 | gym = gymapi.acquire_gym() |
The tensor API is currently available with PhysX only
To use GPU tensors, you must set the use_gpu_pipeline flag to True in the SimParams used to create the simulation. Also, you should configure PhysX to use the GPU:
1 | sim_params = gymapi.SimParams() |
Finally, after all the environments are fully set up, you must call prepare_sim to initialize the internal data structures used by the tensor API:
1 | # ...create sim, envs, and actors here... |
Physics State
After calling prepare_sim, you can acquire the physics state tensors. These tensors represent a cache of the simulation state in an easy-to-use format. It is important to note that these tensors hold a copy of the simulation state. They are not the same data structures as used by the underlying physics engine.
Actor Root State Tensor
A Gym actor can consists of one or more rigid bodies. All actors have a root body. The root state tensor holds the state of all the actor root bodies in the simulation.
To acquire the root state tensor:
1 | # A generic tensor descriptor (not very useful, later wrap it in a PyTorch Tensor obj) |
从 gym 获取的 tensor 为 Gym Tensor,需要利用 gymtorch 库的 wrap_tensor 将其转换为 Pytorch Tensor,进而在 PyTorch 中使用它。逆过程通过 gymtorch.unwrap_tensor 实现
This function will fill the tensor with the latest values from the physics engine. All the views or slices you created from this tensor will update automatically, since they all refer to the same memory buffer. Generally, you’ll want to do this after each call to gym.simulate.
1 | root_positions = root_tensor[:, 0:3] |
As a contrived example, suppose you want to raise all the actors by one unit along the y-axis. You could modify the root positions like this:
1 | # modify the root state tensor in-place |
Another example is doing a periodic reset of actor roots, which would teleport them to their original locations once every 100 steps:
1 | # acquire root state tensor descriptor |
Degrees-of-Freedom
The state of each DOF is represented using two 32-bit floats, the DOF position and DOF velocity. For prismatic (translation) DOFs, the position is in meters and the velocity is in meters per second. For revolute (rotation) DOFs, the position is in radians and the velocity is in radians per second.
The DOF state tensor contains the state of all DOFs in the simulation. The shape of the tensor is (num_dofs, 2). The total number of DOFs can be obtained by calling gym.get_sim_dof_count(sim). The DOF states are laid out sequentially. The tensor begins with all the DOFs of actor 0, followed by all the DOFs of actor 1, and so on. The ordering of DOFs for each actor is the same as with the functions get_actor_dof_states and set_actor_dof_states.
All Rigid Body States
The rigid body state tensor contains the state of all rigid bodies in the simulation. The state of each rigid body is the same as described for the root state tensor - 13 floats capturing the position, orientation, linear velocity, and angular velocity. The shape of the rigid body state tensor is (num_rigid_bodies, 13). The total number of rigid bodies in a simulation can be obtained by calling gym.get_sim_rigid_body_count(sim). The rigid body states are laid out sequentially. The tensor begins with all the bodies of actor 0, followed by all the bodies of actor 1, and so on. The ordering of bodies for each actor is the same as with the functions get_actor_rigid_body_states and set_actor_rigid_body_states.
Control Tensors
The various state tensors (root state tensor, DOF state tensor, and rigid body state tensor) are useful for getting information about actors and setting new poses and velocities instantaneously. Setting states this way is appropriate during resets, when actors need to return to their original pose or restart a task using new initial conditions. However, setting new states directly using those tensors should be done sparingly.
To manage actor behavior during simulation, you can apply DOF forces or PD controls using the following API.
1 | # get total number of DOFs |
Go 1 模型导入 legged_gym
修改 Go 1 模型
使用 PyCharm 比较对象 功能,比较 legged_gym 中 resources 文件夹中的 a1.urdf 和 MICRO_Quadruped_ARCHIVE 中 Robots 文件夹中的 Go1.urdf
对 Go1.urdf 文件进行如下修改
- 增加
base和floating base部分 - 对于
<joint name="**_foot_fixed type="fixed">,增加dont_collapse="true" - 删除
transmission部分
部署到实机上所关心的问题
- observation space 以及单位(如果有的话)
- action space 以及单位(如果有的话)
- default_dof_pos 以及顺序
- 如何将 action 转化为 torque
- 进行了哪些 scale 和 clip
- $K_p$ (stiffness),$K_d$ (damping)
小结
- observation space (48)
base_lin_vel(3) *lin_vel_scale[2.0]base_ang_vel(3) *ang_vel_scale[2.0]projected_gravity(3) [单位化]commands(3) * [lin_vel_scale,lin_vel_scale,ang_vel_scale]dof_pos-default_dof_pos(12)dof_vel(12) *dof_vel_scale[0.05]actions(12)
- action space (12)
self.dof_names:- hip / thigh / calf
- FL / FR / RL / RR
- FL hip / thigh / calf | FR hip / thigh / calf | RL hip / thigh / calf | RR hip / thigh / calf
- Position Mode:
- 下式中的 actions 已经进行了 clip
torque= $K_p$ (actionsaction_scale+default_dof_pos-dof_pos) - $K_d$dof_vel
self.default_dof_pos= $[0.1, 0.65, -1.25, -0.1, 0.65, -1.25, 0.1, 0.65, -1.25, -0.1, 0.65, -1.25]$- $K_p$ = 100, $K_d$ = 2
2023.07.23
Isaac Gym - Tensor API
为了书写的连续性,将此部分内容并入昨天的同名章节中
常用 Gym API
Actor (root_state) 篇
gym.get_sim_actor_count(sim)
gym.get_actor_index(env, actor_handle, gymapi.DOMAIN_SIM)
gym.acquire_actor_root_state_tensor(sim)
gym.refresh_actor_root_state_tensor(sim)
gym.set_actor_root_state_tensor(sim, _root_states)
gym.set_actor_root_state_tensor_indexed()
DOF 篇
gym.get_sim_dof_count(sim)
gym.acquire_dof_state_tensor(sim)
gym.refresh_dof_state_tensor(sim)
gym.set_dof_state_tensor(sim, _dof_states)
gym.set_dof_state_tensor_indexed(sim, _dof_state, gymtorch.unwrap_tensor(actor_indices), 3)
gym.get_actor_dof_count(env, actor)
gym.get_actor_dof_states,gym.set_actor_dof_states
gym.get_actor_dof_properties,gym.set_actor_dof_properties
Rigid Body 篇
gym.get_sim_rigid_body_count(sim)
gym.get_actor_rigid_body_count(env, actor)
gym.get_actor_rigid_body_states, gym.set_actor_rigid_body_states
gym.get_sim_rigid_body_states,gym.set_sim_rigid_body_states
gym.get_env_rigid_body_states,gym.set_env_rigid_body_states
DOF Controls 篇
gym.set_dof_actuation_force_tensor(sim, gymtorch.unwrap_tensor(actions))
gym.set_dof_actuation_force_tensor_indexed()
gym.set_dof_position_target_tensor()
gym.set_dof_position_target_tensor_indexed()
gym.set_dof_velocity_target_tensor()
gym.set_dof_velocity_target_tensor_indexed()
gym.set_actor_dof_position_targets()
gym.set_actor_dof_velocity_targets()
gym.apply_actor_dof_efforts()
Body Forces 篇
gym.apply_rigid_body_force_tensors(sim, force_tensor, torque_tensor, gymapi.ENV_SPACE)
gym.apply_rigid_body_force_tensors(sim, force_tensor, None, gymapi.ENV_SPACE)
gym.apply_rigid_body_force_tensors(sim, None, torque_tensor, gymapi.ENV_SPACE)
gym.apply_rigid_body_force_at_pos_tensors(sim, force_tensor, pos_tensor, gymapi.ENV...)
常用 gymapi
gymapi.DOF_MODE_POS
gymapi.DOF_MODE_VEL
gymapi.DOF_MODE_EFFORT